
Distributed Systems
Homework 3
Student ID: 21307381 Student Name: LJW
Date: 2023.10.27
Lectured by: Pengfei Chen
Distributed Systems Course
Sun Yat-sen University
要求
使用protobuf和gRPC等远程过程调用的方法实现消息订阅(publish-subscribe)系统,该订阅系统能够实现简单的消息传输,还可以控制消息在服务器端存储的时间。(编程语言不限,但是推荐使用python和C;)
1. gRPC
gRPC是搭建分布式应用接口和客户端的框架。在 gRPC 中,客户端应用程序可以直接调用不同机器上的服务器应用程序上的方法,就像它是本地对象一样,可以更容易创建分布式应用程序和服务。与许多 RPC 系统一样,gRPC 基于定义服务的思想,指定可以远程调用的方法及其参数和返回类型。在服务端,服务端实现这个接口并运行一个 gRPC 服务器来处理客户端调用。在客户端,客户端有一个存根(在某些语言中仅称为客户端),它提供与服务器相同的方法。
gRPC客户端和服务端可以在多种环境中运行和交互,例如用java写一个服务端,可以用go语言写客户端调用。
2. protobuf
数据在进行网络传输的时候,需要进行序列化,序列化协议有很多种,比如xml, json,protobuf等。gRPC默认使用protocol buffers,这是google开源的一套成熟的结构数据序列化机制,适合高性能、对响应速度有要求的数据传输场景。因为profobuf是二进制数据格式,需要编码和解码。数据本身不具有可读性。因此只能反序列化之后得到真正可读的数据。
优势:
- 序列化后体积相比Json和XML很小,适合网络传输
- 支持跨平台多语言
- 消息格式升级和兼容性还不错
- 序列化反序列化速度很快
3. 样例实验熟悉gRPC的使用
3.1
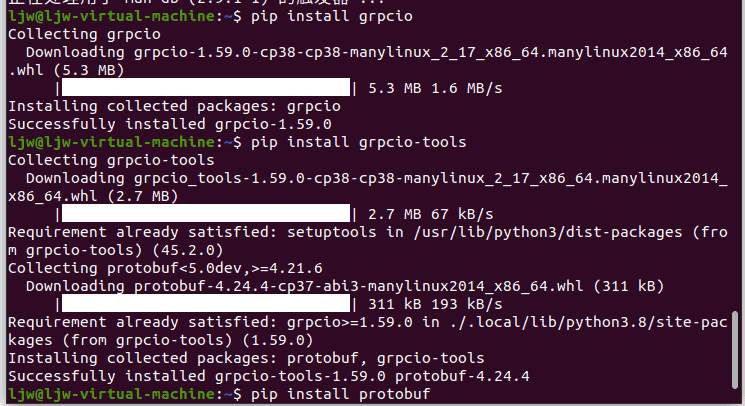
首先,安装python需要的库
1
2
3
pip install grpcio
pip install grpcio-tools
pip install protobuf
3.2 定义接口并编译
定义接口:
这个文件首先定义了两个数据结构,一个是用户的详细信息User,一个是用户信息格式化输出。
需要注意的是当一个message中定义多个变量时,赋值的编号不能相同,如User中的id和name分别是1和2。
然后定义了一个简单的服务UserInfo,将User传入,最后返回Reply(注意是returns,加了s)
1
2
3
4
5
6
7
8
9
10
11
12
13
14
15
16
17
syntax = "proto3";

package hello;

message User {
	string id = 1;
	string name = 2;
}

message Reply {
	string message = 1;
}

service UserInfo {
	rpc Info (User) returns (Reply) {}
}
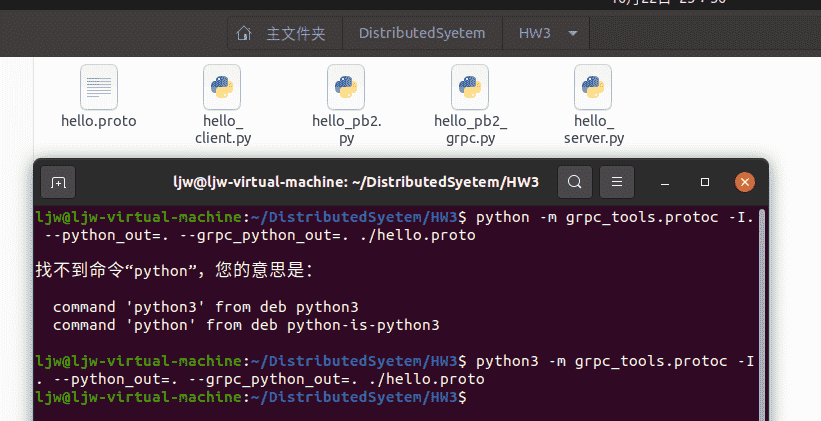
然后,在命令行中使用gRPC的工具包,生成gRPC服务类:
1
python3 -m grpc_tools.protoc -I. --python_out=. --grpc_python_out=. ./hello.proto
它会生成两个文件hello_pb2.py和hello_pb2_grpc.py.
大致可以理解为:_pb2中定义了数据结构。_pb2_grpc中定义了相关的方法。
3.3. 编写客户端和服务器
gRPC 服务器server
如下,定义 gRPC 服务器hello_server.py,并堵塞监测本地50051端口,等待接收数据:
1
2
3
4
5
6
7
8
9
10
11
12
13
14
15
16
17
18
19
20
21
22
from concurrent import futures  # 导入futures模块,用于处理并发任务

import grpc  # 导入grpc库
import hello_pb2  # 导入hello_pb2模块
import hello_pb2_grpc  # 导入hello_pb2_grpc模块

class UserInfo(hello_pb2_grpc.UserInfoServicer):
    def Info(self, request, context):  # 实现proto文件中定义的Info函数
        print('receive data:id=%s,name=%s'%(request.id, request.name))
        return hello_pb2.Reply(message='id: %s; name: %s' % (request.id+' Processed by the server', request.name+' Processed by the server'))

def serve():
    server = grpc.server(futures.ThreadPoolExecutor(max_workers=10))  # 创建一个服务器对象
    hello_pb2_grpc.add_UserInfoServicer_to_server(UserInfo(), server)  # 将UserInfo服务添加到服务器中
    server.add_insecure_port('[::]:50051')  # 在指定端口上启动服务器
    server.start()  # 启动服务器
    print("Server start running")
    server.wait_for_termination()  # 保持服务器运行,等待终止信号

if __name__ == '__main__':
    serve()
在代码中,UserInfo 类继承自生成的hello_pb2_grpc.UserInfoServicer类,并实现了.proto文件中定义的 Info 函数,用于处理客户端发起的远程调用请求。这个函数接收一个请求对象 request 和一个上下文对象 context,并返回一个包含用户信息的响应对象。
request也就是.proto文件中定义的传入函数的值(样例中为User),
在serve()函数中,代码首先创建了一个 gRPC 服务器对象,并通过futures.ThreadPoolExecutor()配置了一个线程池执行器,用于处理并发任务。然后,将UserInfo服务添加到服务器对象中。接下来,通过 server.add_insecure_port() 方法指定服务器监听的端口,并使用 server.start() 启动服务器。最后,使用 server.wait_for_termination() 保持服务器运行,等待终止信号。
gRPC 客户端client
如下,定义 gRPC 客户端hello_client.py,通过接收参数,向本地50051端口,传输用户信息:
1
2
3
4
5
6
7
8
9
10
11
12
13
14
15
16
17
from __future__ import print_function  # 导入print_function特性

import sys  # 导入sys模块,用于获取命令行参数

import grpc  # 导入grpc库
import hello_pb2  # 导入hello_pb2模块
import hello_pb2_grpc  # 导入hello_pb2_grpc模块

def run():
	with grpc.insecure_channel('localhost:50051') as channel:
		stup = hello_pb2_grpc.UserInfoStub(channel)  # 创建一个Stub对象,用于调用远程方法
		response = stup.Info(hello_pb2.User(id=sys.argv[1], name=sys.argv[2]))  # 调用远程方法,Info为在.proto文件中定义的名字
	print("用户信息: " + response.message)  # 打印返回的用户信息

if __name__ == '__main__':
	run()
在主函数run()中,代码首先创建了一个不安全的通道(insecure_channel)连接到指定的服务器地址(’localhost:50051’)。然后,它创建了一个 UserInfoStub 对象用于调用远程方法。Info() 方法接受一个 User 对象作为参数,并返回一个含有用户信息的响应对象。最后,代码打印出返回的用户信息。
response即为.proto文件中定义的函数返回的值(样例中为Reply)
在运行脚本时,过命令行参数传递用户的id和name参数,例如:python3 hello_client.py 21307381 LJW。这样,代码中的 sys.argv[1] 就会获取到命令行参数中的id值,sys.argv[2] 获取到命令行参数中的name值。
3.4 启动gRPC
启动 gRPC
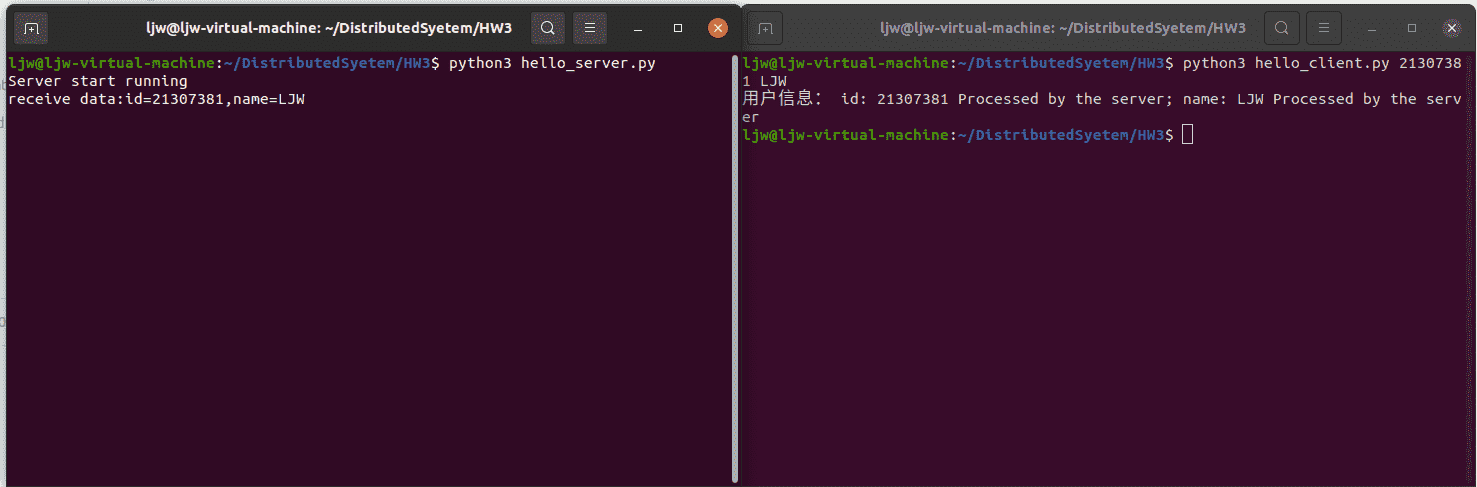
在第一个窗口启动gRPC服务端 :
1
python3 hello_server.py
在另一个终端窗口中,启动gRPC客户端:
1
python3 hello_client.py 21307381 LJW
运行结果如下:可以看到client端调用了server端的函数,然后打印出处理后的数据。
4. 设计并完成实验
一、 问题描述
使用protobuf和gRPC等远程过程调用的方法实现消息订阅(publish-subscribe)系统,该订阅系统能够实现简单的消息传输,还可以控制消息在服务器端存储的时间。(编程语言不限,但是推荐使用python和C;)
二、 解决方案
设计:
publish:向话题topic中发布消息
subscribe:订阅话题后,客户端可以接受发送到该话题的消息
ShowAllMessage:展示该话题内的所有历史消息
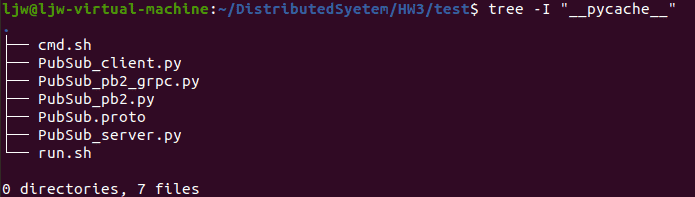
文件结构如下:
设计好功能后,首先在proto中定义好所有的接口:
1
2
3
4
5
6
7
8
9
10
11
12
13
14
15
16
17
18
19
20
21
syntax = "proto3";

message publishRequest {
    string topic = 1;
    string context = 2;
    string clientID=3;
}

message reply {
    string message = 1;
}

message subRequest {
    string topic = 1;
}

service PubSub {
    rpc publish(publishRequest) returns (reply) {}
    rpc subscribe(subRequest) returns (stream reply) {}
    rpc ShowAllMessage(subRequest) returns (stream reply) {}
}
然后,在命令行中使用gRPC的工具包,生成gRPC服务类:
1
python3 -m grpc_tools.protoc -I. --python_out=. --grpc_python_out=. ./PubSub.proto
这里需要注意的是流式信息在客户端和服务器中的操作与非流式信息有所不同,具体分析见【四、遇到的问题及解决方法-1】
然后完成客户端client:
这里也就是用stub桩函数来远程调用服务器中实现的三个函数。
1
2
3
4
5
6
7
8
9
10
11
12
13
14
15
16
17
18
19
20
21
22
23
24
25
26
27
28
29
30
31
32
33
34
35
36
37
38
39
40
41
42
43
44
45
46
47
import grpc
import threading
import PubSub_pb2
import PubSub_pb2_grpc

clientId = input("Please input ClientId: ")
channel = grpc.insecure_channel('localhost:50051')
stub = PubSub_pb2_grpc.PubSubStub(channel) # 创建一个Stub对象,用于调用远程方法
#Stub中有在proto文件中规定的3个接口:


def publish(topic, context,clientID):
    response = stub.publish(PubSub_pb2.publishRequest(topic=topic, context=context,clientID=clientID))
    print('client:',clientID,'has published:',response.message)
    print('---------------------------------------')

def subscribe(topic):
    response = stub.subscribe(PubSub_pb2.subRequest(topic=topic))
    for item in response:
        print(item.message)
    print('---------------------------------------')

def ShowAllMessage(topic):
    response = stub.ShowAllMessage(PubSub_pb2.subRequest(topic=topic))
    for item in response:
        print(item.message)
    print('---------------------------------------')

def main():
    while True:
        print('---------------------------------------')
        user_input=input("输入 1:订阅话题 2:发布消息 3:查询话题历史消息 ,输入exit退出\n")
        if user_input == "1":
            user_input_topic=input("请输入要订阅的话题:")
            subscribe(user_input_topic)
        elif user_input == "2":
            user_input_topic=input("请输入要发布消息的话题:")
            user_input_context=input("输入发布内容:")
            publish(user_input_topic, user_input_context,clientId)
        elif user_input == "3":
            user_input_topic=input("请输入要查询的话题:")
            ShowAllMessage(user_input_topic)
        elif user_input == 'exit':
            print("退出系统")
            break
if __name__=="__main__":
    main()
首先,是要在服务器中用gRPC框架搭建一个服务器:
创建一个线程池执行器ThreadPoolExecutor,用于处理客户端请求。
然后调用自动生成的 PubSub_pb2_grpc.add_PubSubServicer_to_server将proto中定义的服务添加到服务器中。
接下来,通过调用add_insecure_port方法,在50051端口上启动服务器,服务器不进行TLS加密认证。
最后,通过调用start方法启动服务器。
1
2
3
4
5
6
7
	 #gRPC
    server = grpc.server(futures.ThreadPoolExecutor(max_workers=10)) #创建一个gRPC服务器
    test_server = PubsubService()
    PubSub_pb2_grpc.add_PubSubServicer_to_server(test_server, server) # 将proto中定义的服务添加到服务器中
    server.add_insecure_port('[::]:50051') # 在指定端口上启动服务器
    server.start()                          # 启动服务器
    print('Hello from server!')
在发布publish服务中,为了实现实时通信,我使用了redis数据库,以保证实时通信,为了可以定期删除过期的信息,还需要维护一个AllTopic的字典列表,每一个消息都有一个时间戳用于定期删除。
1
2
3
4
5
6
7
8
9
10
11
12
13
14
15
16
17
18
19
20
21
22
23
def publish(self, publishRequest, context):
        _topic=publishRequest.topic
        _context=publishRequest.context
        _clientID=publishRequest.clientID

        # 创建Redis连接池
        pool = redis.ConnectionPool(host='localhost', port=6379)
        # 创建Redis客户端
        r = redis.Redis(connection_pool=pool)
        r.publish(_topic, _context)

        if _topic not in self.AllTopic:
            self.AllTopic[_topic] = [{'context':_context, 'timeStamp':time.time()}]
        else:
            self.AllTopic[_topic].append({'context':_context,'timeStamp':time.time()})

        print('---------------------------------------')
        print('Server receive topic {} from client {}:'.format(_topic,_clientID))
        print(_context)
        print('---------------------------------------')
        # newmessage='serverpub'

        return PubSub_pb2.reply(message = _context)
订阅服务中,同样是调用redis用以实时通信,由于pubsub.listen()是阻塞式的,所以用threading.Timer定时使其退出订阅,以便客户端之后可以进行其他的操作。同样,由于是阻塞式的,所以stop_listening中发布一个nosub消息作为停止订阅的信号。值得注意的是redis中传递消息的时候用的是字节字符串(bytes)类型,所以会带来一些麻烦:具体分析见【四、遇到的问题及解决方法-3】
1
2
3
4
5
6
7
8
9
10
11
12
13
14
15
16
17
18
19
20
21
 def subscribe(self, subRequest, context):
        _topic=subRequest.topic
        # 创建Redis连接池
        pool = redis.ConnectionPool(host='localhost', port=6379)
        # 创建Redis客户端
        r = redis.Redis(connection_pool=pool)
        # 订阅频道
        pubsub = r.pubsub()
        pubsub.subscribe(_topic)
        # currentTime=time.time()
        # 接收消息
        # 设置定时 器,5秒后触发stop_listening函数
        timer = threading.Timer(20, stop_listening,args=(r,_topic)) #定时20s
        timer.start()
        for message in pubsub.listen():
            if message['type'] == 'message':
                if message['data'] == 'unsub'.encode():  #不知道为什么是这个,我设置的是unsub,但是打印出来看到是这个
                    return PubSub_pb2.reply(message='退出订阅')
                # print(message['data'],'here')
                # print('收到消息:', message['data'])
                yield PubSub_pb2.reply(message=message['data'])
1
2
3
4
5
# 定义一个函数,在定时器触发时中断监听循环
def stop_listening(r,_topic):
    print('订阅结束')
    _context='unsub'
    r.publish(_topic,_context)
展示所有信息就是把维护的AllTopic字典中当前的话题topic的消息都取出来打印。
1
2
3
4
5
6
7
8
def ShowAllMessage(self,subRequest, context):
        _topic=subRequest.topic
        if _topic in self.AllTopic:
            for newmessage in self.AllTopic[_topic]: #newmessage是一个字典,形如{'context':sajfoiasphfashdlkjhfjklhs}
                # print(newmessage)
                newmessage_context = newmessage['context']
                yield PubSub_pb2.reply(message=newmessage_context)
更新过期信息也是在这里,遍历AllTopic找到过期的信息删除即可。可以修改timeThreshold的值来修改信息保存的时间。
1
2
3
4
5
6
7
8
9
10
11
 def update(self):
        timeThreshold=10
        # print('update')
        # 遍历所有话题
        for topic in self.AllTopic:
            messages = self.AllTopic[topic]
            # 遍历话题中的所有消息
            for message in messages:
                # 如果消息超过 10 秒,则删除该消息
                if time.time() - message['timeStamp'] > timeThreshold:
                    messages.remove(message)
如何运行我的代码:
- 首先要打开redis数据库:
也就是从官网下载最新版redis-X.Y.Z.tar.gz后解压,然后进入redis-X.Y.Z文件夹后直接make即可
运行:
make成功后会在src文件夹下产生一些二进制可执行文件,直接输入
./redis-server就可以启动服务端了
- 然后直接运行bash run.sh
1
2
3
4
5
6
7
8
9
10
11
12
13
14
15
16
#!/bin/bash

# 打开第一个终端窗口并执行Python
gnome-terminal --command="bash -c 'echo \"window 1 as server\"; python3 /home/ljw/DistributedSyetem/HW3/test/PubSub_server.py; exec bash'"

# 等待一段时间,确保前一个窗口已经打开
sleep 1

# 打开第二个终端窗口并执行Python
gnome-terminal --command="bash -c 'echo \"window 2 as client1\"; python3 /home/ljw/DistributedSyetem/HW3/test/PubSub_client.py; exec bash'"

# 等待一段时间,确保前一个窗口已经打开
sleep 1

# 打开第三个终端窗口并执行Python
gnome-terminal --command="bash -c 'echo \"window 3 as client2\"; python3 /home/ljw/DistributedSyetem/HW3/test/PubSub_client.py; exec bash'"
三、 实验结果
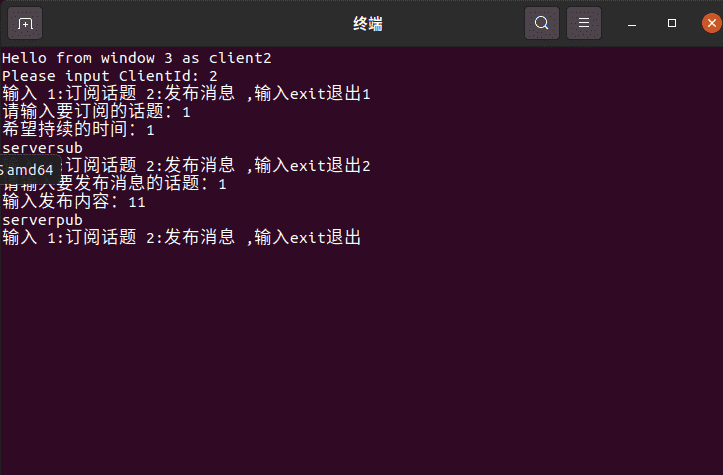
如上图:左上角的窗口是服务器server,左下角是第一个客户端client1,右边为客户端client2:
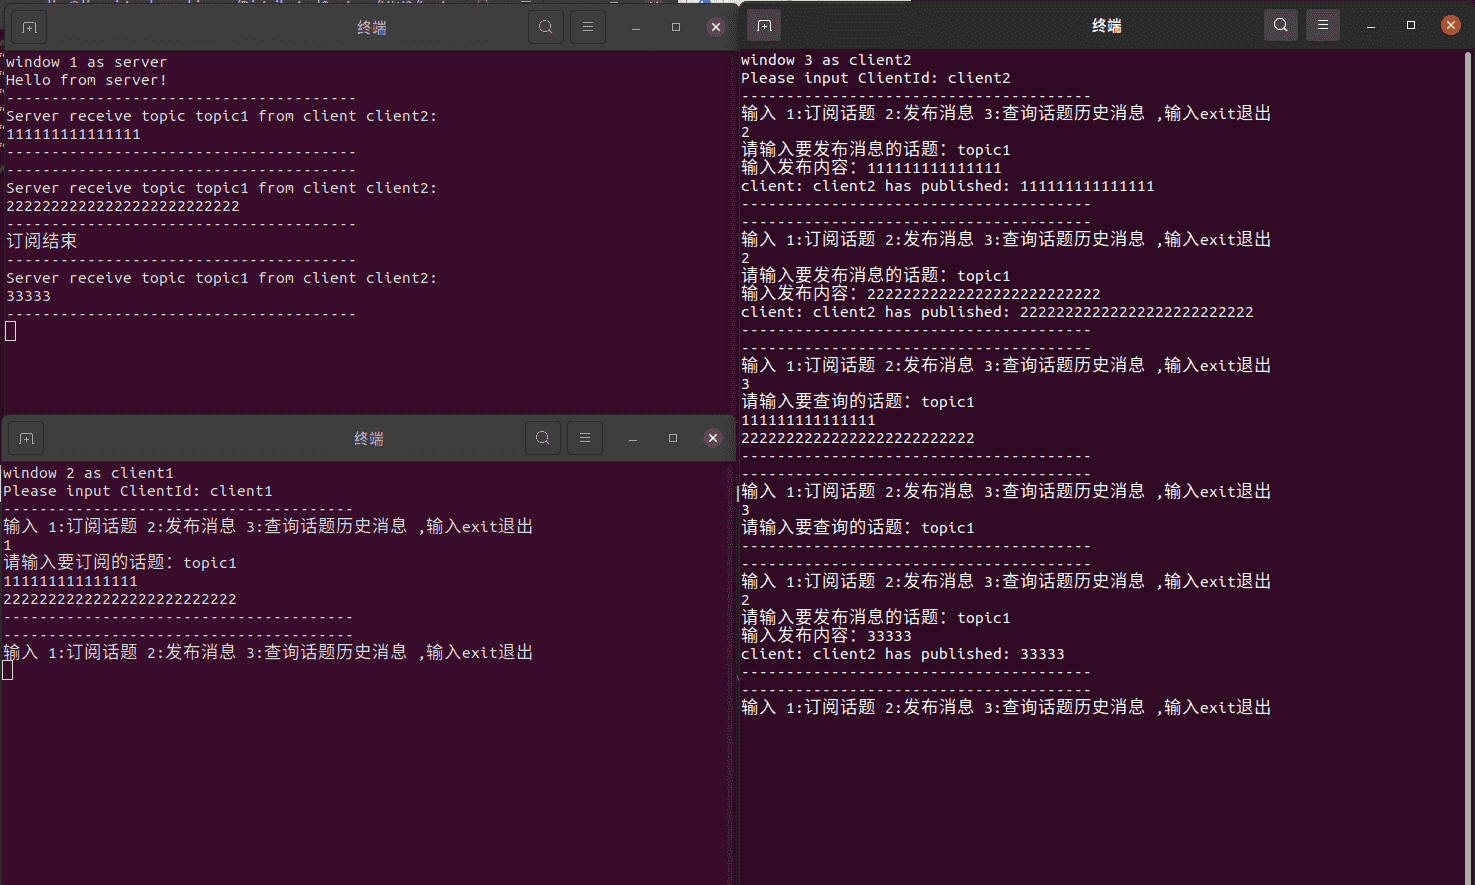
首先client1订阅话题topic1,然后连续用client2发布2个内容到topic1,可以看到client1可以成功接收如下图:
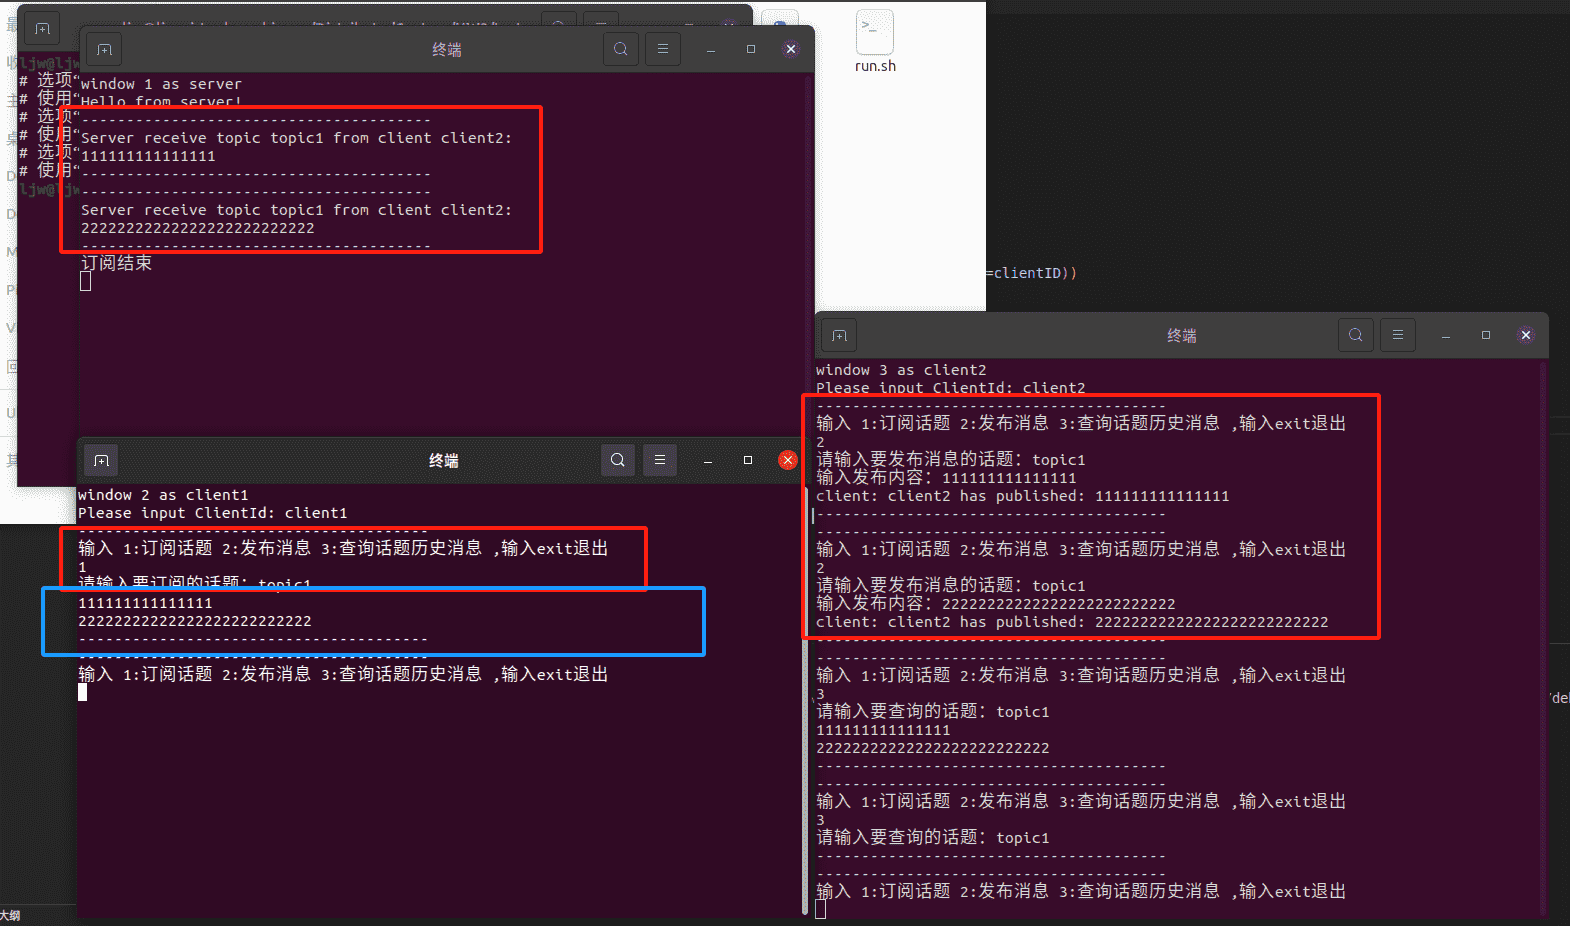
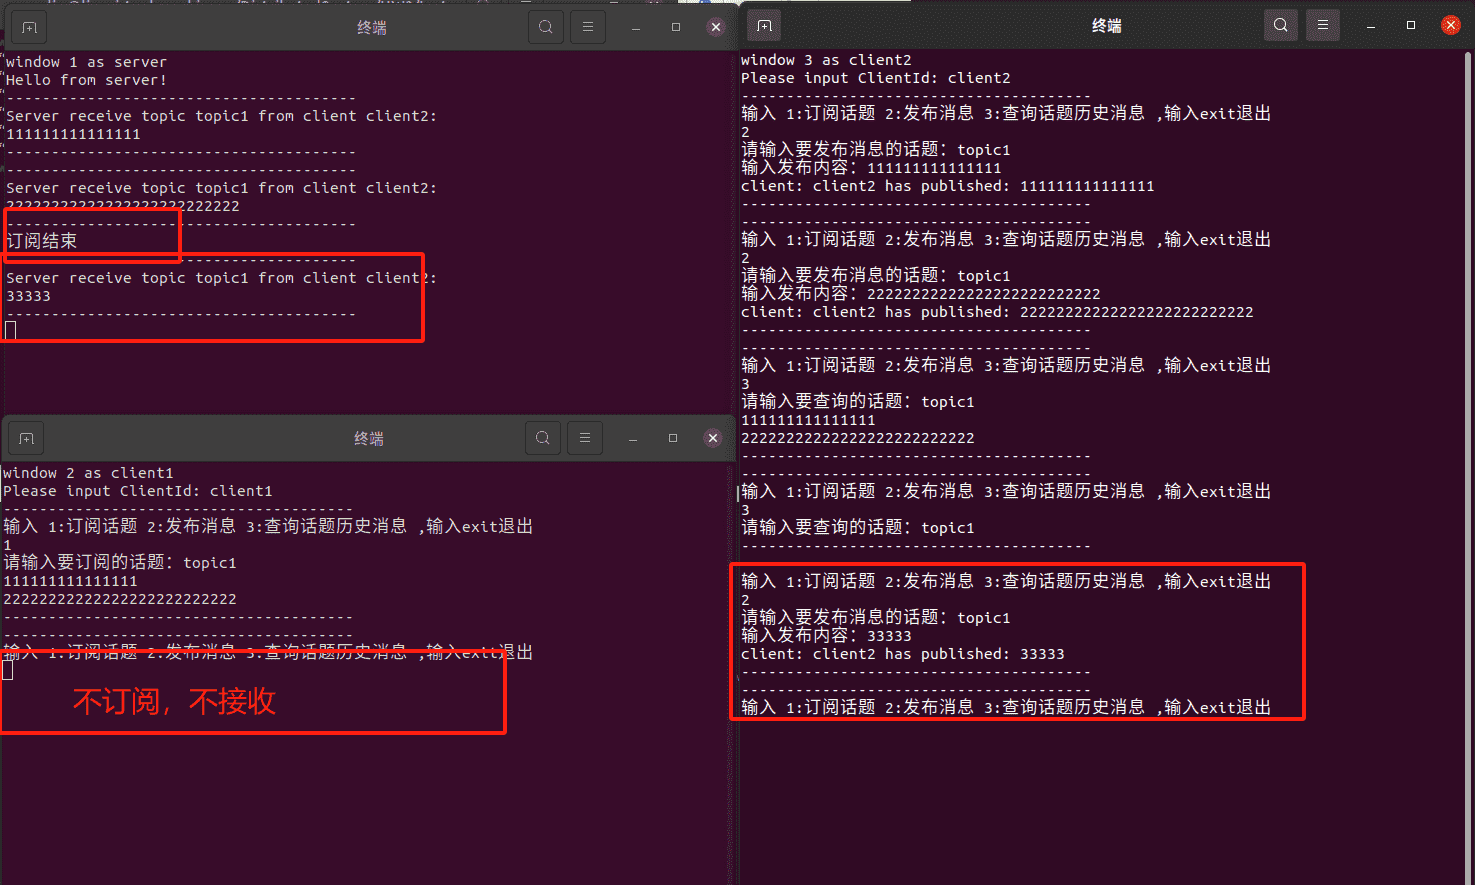
但是不订阅的话,就不会接收:
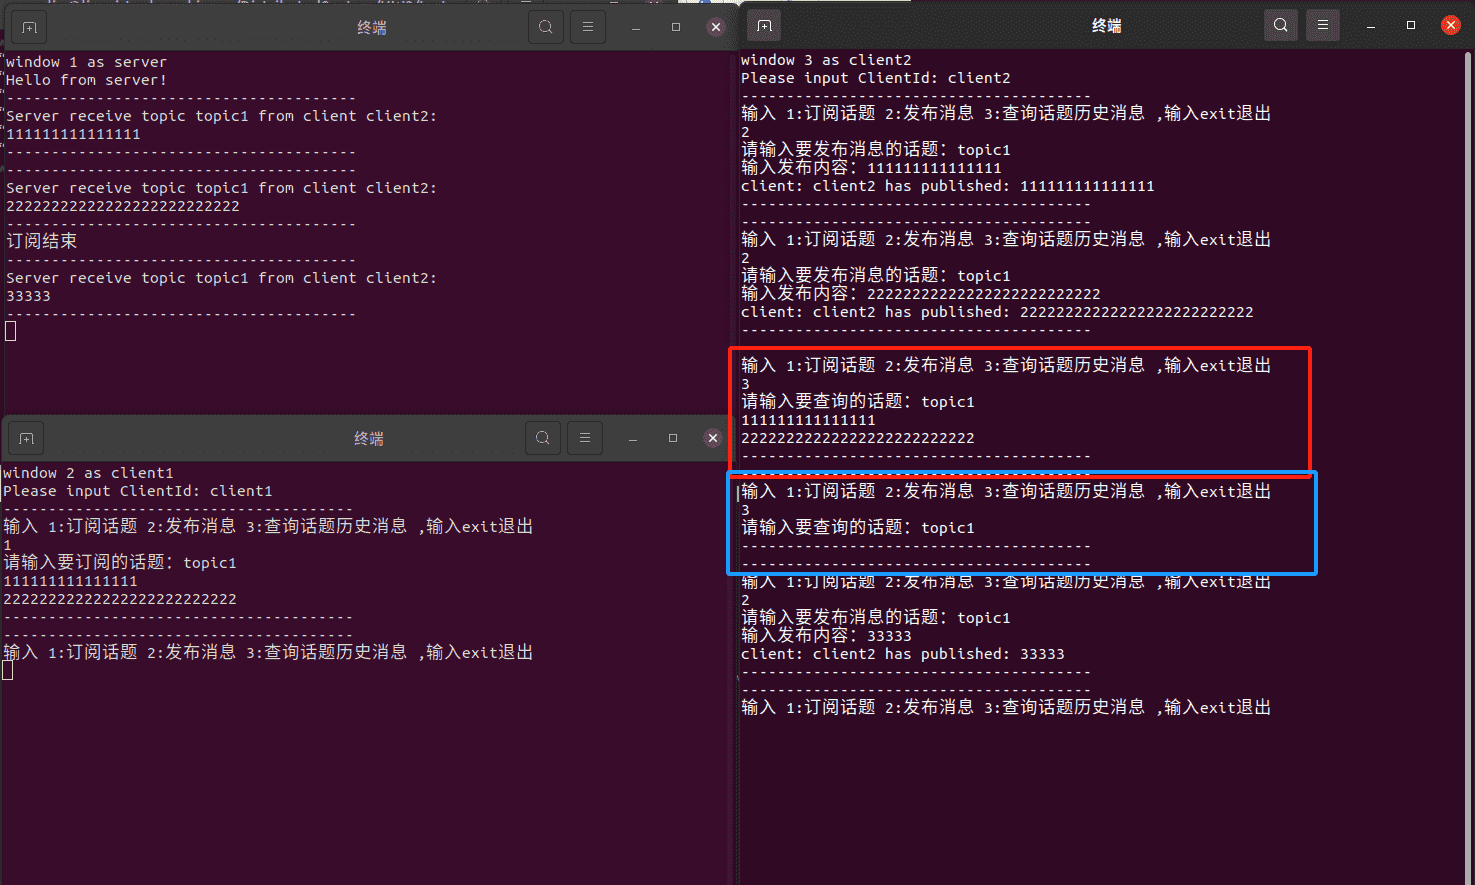
还可以控制消息在服务器存储的时间:如下图,过期之前可以查看话题topic中所有消息,可以看到之前发过的内容都在里面(下图红框),但是第二次等到超过了我设置的时间后,记录就被删除了,再次查看了就发现历史记录已经被散掉(下路蓝框)
四、遇到的问题及解决方法
1. 搭建框架时流式数据的问题
搭建框架时,由于消息订阅系统是长时间操作的,当需要执行长时间运行的操作时,使用gRPC的流式处理可以让客户端和服务端之间保持连接并持续发送和接收数据。所以在定义subcribe的时候用的是gRPC的流式处理。
1
rpc subcribe(subRequest) returns (stream reply) {}
客户端代码如下
1
2
3
def subcribe(topic, TTL=10):
    response = stub.subcribe(test_pb2.subRequest(topic=topic))
    print(response.message)
此时第一次报错:
1
2
3
4
5
6
7
8
Traceback (most recent call last):
  File "/home/ljw/DistributedSyetem/HW3/test/test_client.py", line 45, in <module>
    main()
  File "/home/ljw/DistributedSyetem/HW3/test/test_client.py", line 33, in main
    subcribe(user_input_topic, user_input_ttl)
  File "/home/ljw/DistributedSyetem/HW3/test/test_client.py", line 22, in subcribe
    print(response.message)
AttributeError: '_MultiThreadedRendezvous' object has no attribute 'message'
查询后发现是因为返回的是流数据,所以client中应该改为
1
2
3
4
def subcribe(topic, TTL=10):
    response = stub.subcribe(test_pb2.subRequest(topic=topic))
    for item in response:
        print(item.message)
此时运行发生第二次报错:
1
2
3
4
5
6
7
8
9
10
11
12
13
14
15
16
Traceback (most recent call last):
  File "/home/ljw/DistributedSyetem/HW3/test/test_client.py", line 46, in <module>
    main()
  File "/home/ljw/DistributedSyetem/HW3/test/test_client.py", line 34, in main
    subcribe(user_input_topic, user_input_ttl)
  File "/home/ljw/DistributedSyetem/HW3/test/test_client.py", line 22, in subcribe
    for item in response:
  File "/home/ljw/.local/lib/python3.8/site-packages/grpc/_channel.py", line 541, in __next__
    return self._next()
  File "/home/ljw/.local/lib/python3.8/site-packages/grpc/_channel.py", line 967, in _next
    raise self
grpc._channel._MultiThreadedRendezvous: <_MultiThreadedRendezvous of RPC that terminated with:
	status = StatusCode.UNKNOWN
	details = "Exception iterating responses: 'reply' object is not an iterator"
	debug_error_string = "UNKNOWN:Error received from peer  {grpc_message:"Exception iterating responses: \'reply\' object is not an iterator", grpc_status:2, created_time:"2023-10-27T13:31:49.624390454+08:00"}"
第二次报错是因为: 服务器给客户端返回的是流数据,所以要用生成器 ,也就是return改为yield
yield是一个关键字,用于在 Python 中定义生成器函数。生成器函数是一种特殊的函数,它可以暂停执行并返回一个中间结果,然后在需要时恢复执行。当在生成器函数中使用
yield语句时,它会将当前函数的状态保存,并返回一个值给调用者。然后,下次调用生成器函数时,它会从上次暂停的地方继续执行,并返回下一个值。这样的过程可以重复多次,直到生成器函数的逻辑执行完毕或遇到return语句。
server中改为如下:
1
2
3
def subcribe(self, request, context):
	newmessage='serversub'
	yield test_pb2.reply(message=newmessage)
这时候代码框架就可以跑起来了:
2. 如何实现实时发送信息
一开始逻辑如下,发现只有先发布消息,然后订阅话题,才可以得到发布的消息,也就是展示历史消息:
1
2
3
4
5
6
7
8
    def subcribe(self, subRequest, context):
        _topic=subRequest.topic
        if _topic in self.AllTopic:
            for newmessage in self.AllTopic[_topic]:
                print(newmessage)
                newmessage_context = newmessage['context']
        # newmessage='serversub'
                yield test_pb2.reply(message=newmessage_context)
而且只可以阻塞式的接受消息,也就是只有订阅结束之后才可以收到消息,这是因为函数subscribe结束后才可以return ,那么就想到可不可以引入一个中间件,订阅就查看消息队列,发送就发送到消息队列呢?
但是这是RPC,所以当然不可以用程序里的一个列表作为消息队列,因为这样也是要return才可以返回。网上查询资料后发现,可以用redis来解决这一个问题:
简介:
Redis是一个开源的,先进的key-value持久化产品。它通常被称为数据结构服务器,它的值可以是字符串(String)、哈希(Map)、列表(List)、集合(Sets)和有序集合(Sorted sets)等类型。可以在这些类型上面做一些原子操作,如:字符串追加、增加Hash里面的值、添加元素到列表、计算集合的交集,并集和差集;或者区有序集合中排名最高的成员。为了取得好的性能,Redis是一个内存型数据库。不限于此,Redis也可以把数据持久化到磁盘中,或者把数据操作指令追加了一个日志文件,把它用于持久化。也可以用Redis容易的搭建master-slave架构用于数据复制。其它让它像缓存的特性包括,简单的check-and-set机制,pub/sub和配置设置。Redis可以用大部分程序语言来操作:C、C++、C#、Java、Node.js、php、ruby等等。Redis是用ANSIC写的,可以运行在多数POSIX系统,如:Linux,*BSD,OS X和Soloris等。官方版本不支持Windows下构建,可以选择一些修改过的版本,照样可以使用Redis。
下载步骤:
从官网下载最新版redis-X.Y.Z.tar.gz后解压,然后进入redis-X.Y.Z文件夹后直接make即可
运行:
make成功后会在src文件夹下产生一些二进制可执行文件,直接输入./redis-server就可以启动服务端了
3. 给subscribe设置定时
发现此时进入了订阅模式就退不出来执行其他的命令了,所以给sub设置一个计时器,不可以使用singal,因为singal只可以用于主线程,但是我实现的subscribe用的是子线程。
然后还尝试了用时间差值的方法:
1
2
3
4
5
6
7
8
9
10
        # currentTime=time.time()
        for message in pubsub.listen():
        	runTime=.time.time()
        	if runTime-currrentTime>10:
        		return test_pb2.reply(message='退出订阅')
            if message['type'] == 'message':
                if message['data'] == ' b\'unsub\'':  #不知道为什么是这个,我设置的是unsub,但是打印出来看到是这个
                    return test_pb2.reply(message='退出订阅')
                print('收到消息:', message['data'])
                yield test_pb2.reply(message=message['data'])
但是发现 for message in pubsub.listen():是阻塞式的,所以没有新消息来就不会继续运行,所以也放弃了。
最后发现可以用以下方法:
1
2
3
4
5
6
7
8
9
 # 设置定时器,5秒后触发stop_listening函数
        timer = threading.Timer(20, stop_listening,args=(r,_topic)) #定时20s
        timer.start()
        for message in pubsub.listen():
            if message['type'] == 'message':
                if message['data'] == ' b\'unsub\'':  #不知道为什么是这个,我设置的是unsub,但是打印出来看到是这个
                    return test_pb2.reply(message='退出订阅')
                print('收到消息:', message['data'])
                yield test_pb2.reply(message=message['data'])
其中有一点很怪的是我传递的是unsub但是,得到的却是 b\'unsub\'
1
2
3
4
5
# 定义一个函数,在定时器触发时中断监听循环
def stop_listening(r,_topic):
    print('订阅结束')
    _context='unsub'
    r.publish(_topic,_context)
后面有尝试了一次,又不行了,需要改为如下:
1
if message['data'] == 'unsub'.encode():  #不知道为什么是这个,我设置的是unsub,但是打印出来看到是这个
这是因为在 Redis 中,发布和订阅的消息都被视为二进制安全的字符串,因此在 Python 中使用 Redis 客户端时,发送和接收的消息都是字节字符串(bytes)类型。这就是为什么收到的消息是以 b 前缀开头的原因。所以使用 Redis 的发布功能时,需要将要发布的消息转换为字节字符串。在 Python 3 中,可以使用字符串的 encode 方法将字符串转换为字节字符串。
4.更新消息列表删除超时消息
1
2
3
4
5
6
7
8
9
10
11
12
13
14
15
16
17
18
19
20
21
22
    try:
        while True:
            # print('here')
            time.sleep(1)
            test_server.update()
    except KeyboardInterrupt:
        server.stop(0)

    server.wait_for_termination()  # 保持服务器运行,等待终止信号

    #redis
    #创建订阅线程
    subscribe_thread = threading.Thread(target=test_server.subscribe)
    # print('1')
    subscribe_thread.start()
    # print('2')

    # 创建发布线程
    publish_thread = threading.Thread(target=test_server.publish)
    # print('3')
    publish_thread.start()
    # print('4')
如果把while循环放到server.wait_for_termination() # 保持服务器运行,等待终止信号这一句后面,那么根本就不会运行。
五、遇到问题的参考教程
redis 发布订阅(PubSub),深入解读:解决流式数据
六、实验心得
gRPC之前没了解过,但是使用起来还是比较方便的,网络上关于gRPC的订阅系统使用 go 语言的参考资料比较多,但是go + grpc + protobuf 的环境配置比较困难,python 环境配置简单而且熟悉语法,所以选择使用python语言完成。
七、代码附录
文件结构
PubSub.proto
1
2
3
4
5
6
7
8
9
10
11
12
13
14
15
16
17
18
19
20
21
syntax = "proto3";

message publishRequest {
    string topic = 1;
    string context = 2;
    string clientID=3;
}

message reply {
    string message = 1;
}

message subRequest {
    string topic = 1;  // 主题
}

service PubSub {
    rpc publish(publishRequest) returns (reply) {}
    rpc subscribe(subRequest) returns (stream reply) {}
    rpc ShowAllMessage(subRequest) returns (stream reply) {}
}
PubSub_client,py
1
2
3
4
5
6
7
8
9
10
11
12
13
14
15
16
17
18
19
20
21
22
23
24
25
26
27
28
29
30
31
32
33
34
35
36
37
38
39
40
41
42
43
44
45
46
47
48
import grpc
import threading
import PubSub_pb2
import PubSub_pb2_grpc

clientId = input("Please input ClientId: ")
channel = grpc.insecure_channel('localhost:50051')
stub = PubSub_pb2_grpc.PubSubStub(channel) # 创建一个Stub对象,用于调用远程方法
#Stub中有在proto文件中规定的3个接口:


def publish(topic, context,clientID):
    response = stub.publish(PubSub_pb2.publishRequest(topic=topic, context=context,clientID=clientID))
    print('client:',clientID,'has published:',response.message)
    print('---------------------------------------')

def subscribe(topic):
    response = stub.subscribe(PubSub_pb2.subRequest(topic=topic))
    for item in response:
        print(item.message)
    print('---------------------------------------')

def ShowAllMessage(topic):
    response = stub.ShowAllMessage(PubSub_pb2.subRequest(topic=topic))
    for item in response:
        print(item.message)
    print('---------------------------------------')

def main():
    while True:
        print('---------------------------------------')
        user_input=input("输入 1:订阅话题 2:发布消息 3:查询话题历史消息 ,输入exit退出\n")
        if user_input == "1":
            user_input_topic=input("请输入要订阅的话题:")
            subscribe(user_input_topic)
        elif user_input == "2":
            user_input_topic=input("请输入要发布消息的话题:")
            user_input_context=input("输入发布内容:")
            publish(user_input_topic, user_input_context,clientId)
        elif user_input == "3":
            user_input_topic=input("请输入要查询的话题:")
            ShowAllMessage(user_input_topic)
        elif user_input == 'exit':
            print("退出系统")
            break

if __name__=="__main__":
    main()
PubSub_server.py
1
2
3
4
5
6
7
8
9
10
11
12
13
14
15
16
17
18
19
20
21
22
23
24
25
26
27
28
29
30
31
32
33
34
35
36
37
38
39
40
41
42
43
44
45
46
47
48
49
50
51
52
53
54
55
56
57
58
59
60
61
62
63
64
65
66
67
68
69
70
71
72
73
74
75
76
77
78
79
80
81
82
83
84
85
86
87
88
89
90
91
92
93
94
95
96
97
98
99
100
101
102
103
104
105
106
107
108
109
110
111
112
113
114
115
116
117
118
119
120
from concurrent import futures
import time
import grpc
import threading
import redis
import PubSub_pb2
import PubSub_pb2_grpc


# 定义一个函数,在定时器触发时中断监听循环
def stop_listening(r,_topic):
    print('订阅结束')
    _context='unsub'
    r.publish(_topic,_context)


class PubsubService(PubSub_pb2_grpc.PubSubServicer): #这一个类是用来实现proto文件中规定的2个接口的
    def __init__(self):
        self.AllTopic={} #话题对应的内容

    def publish(self, publishRequest, context):
        _topic=publishRequest.topic
        _context=publishRequest.context
        _clientID=publishRequest.clientID
        # 创建Redis连接池
        pool = redis.ConnectionPool(host='localhost', port=6379)
        # 创建Redis客户端
        r = redis.Redis(connection_pool=pool)
        r.publish(_topic, _context)

        if _topic not in self.AllTopic:
            self.AllTopic[_topic] = [{'context':_context, 'timeStamp':time.time()}]
        else:
            self.AllTopic[_topic].append({'context':_context,'timeStamp':time.time()})

        print('---------------------------------------')
        print('Server receive topic {} from client {}:'.format(_topic,_clientID))
        print(_context)
        print('---------------------------------------')
        # newmessage='serverpub'

        return PubSub_pb2.reply(message = _context)

    def subscribe(self, subRequest, context):
        _topic=subRequest.topic
        # 创建Redis连接池
        pool = redis.ConnectionPool(host='localhost', port=6379)
        # 创建Redis客户端
        r = redis.Redis(connection_pool=pool)
        # 订阅频道
        pubsub = r.pubsub()
        pubsub.subscribe(_topic)
        # currentTime=time.time()
        # 接收消息
        # 设置定时 器,5秒后触发stop_listening函数
        timer = threading.Timer(20, stop_listening,args=(r,_topic)) #定时20s
        timer.start()
        for message in pubsub.listen():
            if message['type'] == 'message':
                if message['data'] == 'unsub'.encode():  #不知道为什么是这个,我设置的是unsub,但是打印出来看到是这个
                    return PubSub_pb2.reply(message='退出订阅')
                # print(message['data'],'here')
                # print('收到消息:', message['data'])
                yield PubSub_pb2.reply(message=message['data'])


    def ShowAllMessage(self,subRequest, context):
        _topic=subRequest.topic
        if _topic in self.AllTopic:
            for newmessage in self.AllTopic[_topic]: #newmessage是一个字典,形如{'context':sajfoiasphfashdlkjhfjklhs}
                # print(newmessage)
                newmessage_context = newmessage['context']
                yield PubSub_pb2.reply(message=newmessage_context)


    def update(self):
        # print('update')
        # 遍历所有话题
        timeThreshold = 10
        for topic in self.AllTopic:
            messages = self.AllTopic[topic]
            # 遍历话题中的所有消息
            for message in messages:
                # 如果消息超过 10 分钟,则删除该消息
                if time.time() - message['timeStamp'] > timeThreshold:
                    messages.remove(message)

if __name__ == '__main__':

    #gRPC
    server = grpc.server(futures.ThreadPoolExecutor(max_workers=20)) #创建一个gRPC服务器
    test_server = PubsubService()
    PubSub_pb2_grpc.add_PubSubServicer_to_server(test_server, server) # 将proto中定义的test服务添加到服务器中
    server.add_insecure_port('[::]:50051') # 在指定端口上启动服务器
    server.start()                          # 启动服务器
    print('Hello from server!')
    try:
        while True:
            # print('here')
            time.sleep(1)
            test_server.update()
    except KeyboardInterrupt:
        server.stop(0)

    server.wait_for_termination()  # 保持服务器运行,等待终止信号

    #redis
    #创建订阅线程
    subscribe_thread = threading.Thread(target=test_server.subscribe)
    # print('1')
    subscribe_thread.start()
    # print('2')

    # 创建发布线程
    publish_thread = threading.Thread(target=test_server.publish)
    # print('3')
    publish_thread.start()
    # print('4')
cmd.sh
1
python3 -m grpc_tools.protoc -I. --python_out=. --grpc_python_out=. ./PubSub.proto
run.sh
1
2
3
4
5
6
7
8
9
10
11
12
13
14
15
16
17
18
#!/bin/bash


# 打开第一个终端窗口并执行Python
gnome-terminal --command="bash -c 'echo \"window 1 as server\"; python3 /home/ljw/DistributedSyetem/HW3/test/PubSub_server.py; exec bash'"

# 等待一段时间,确保前一个窗口已经打开
sleep 1

# 打开第二个终端窗口并执行Python
gnome-terminal --command="bash -c 'echo \"window 2 as client1\"; python3 /home/ljw/DistributedSyetem/HW3/test/PubSub_client.py; exec bash'"

# 等待一段时间,确保前一个窗口已经打开
sleep 1

# 打开第三个终端窗口并执行Python
gnome-terminal --command="bash -c 'echo \"window 3 as client2\"; python3 /home/ljw/DistributedSyetem/HW3/test/PubSub_client.py; exec bash'"